

3.2.3. Sending Rich Push Notifications
Custom Setup Guide
Before you begin, make sure you have successfully completed the following steps:
By the end of this guide you should see the following results:
- The target device will display a mobile push notification with a small square image on the right. A long tap will expand the image to full screen.
- Once expanded, the mobile push notification displays the buttons you set up.
In addition to the usual title and body text in standard push notifications, rich push notifications can have a clickable image with up to 3 buttons.
Displaying images
This step will help you to:
Display a push notification with a small square image on the right and expand the image to full screen with a long tap.
To check that your push notifications are sent correctly, please refer to this guide.
To display images in push notifications, you’ll need to implement the Notification Service Extension.
1. Adding an extension
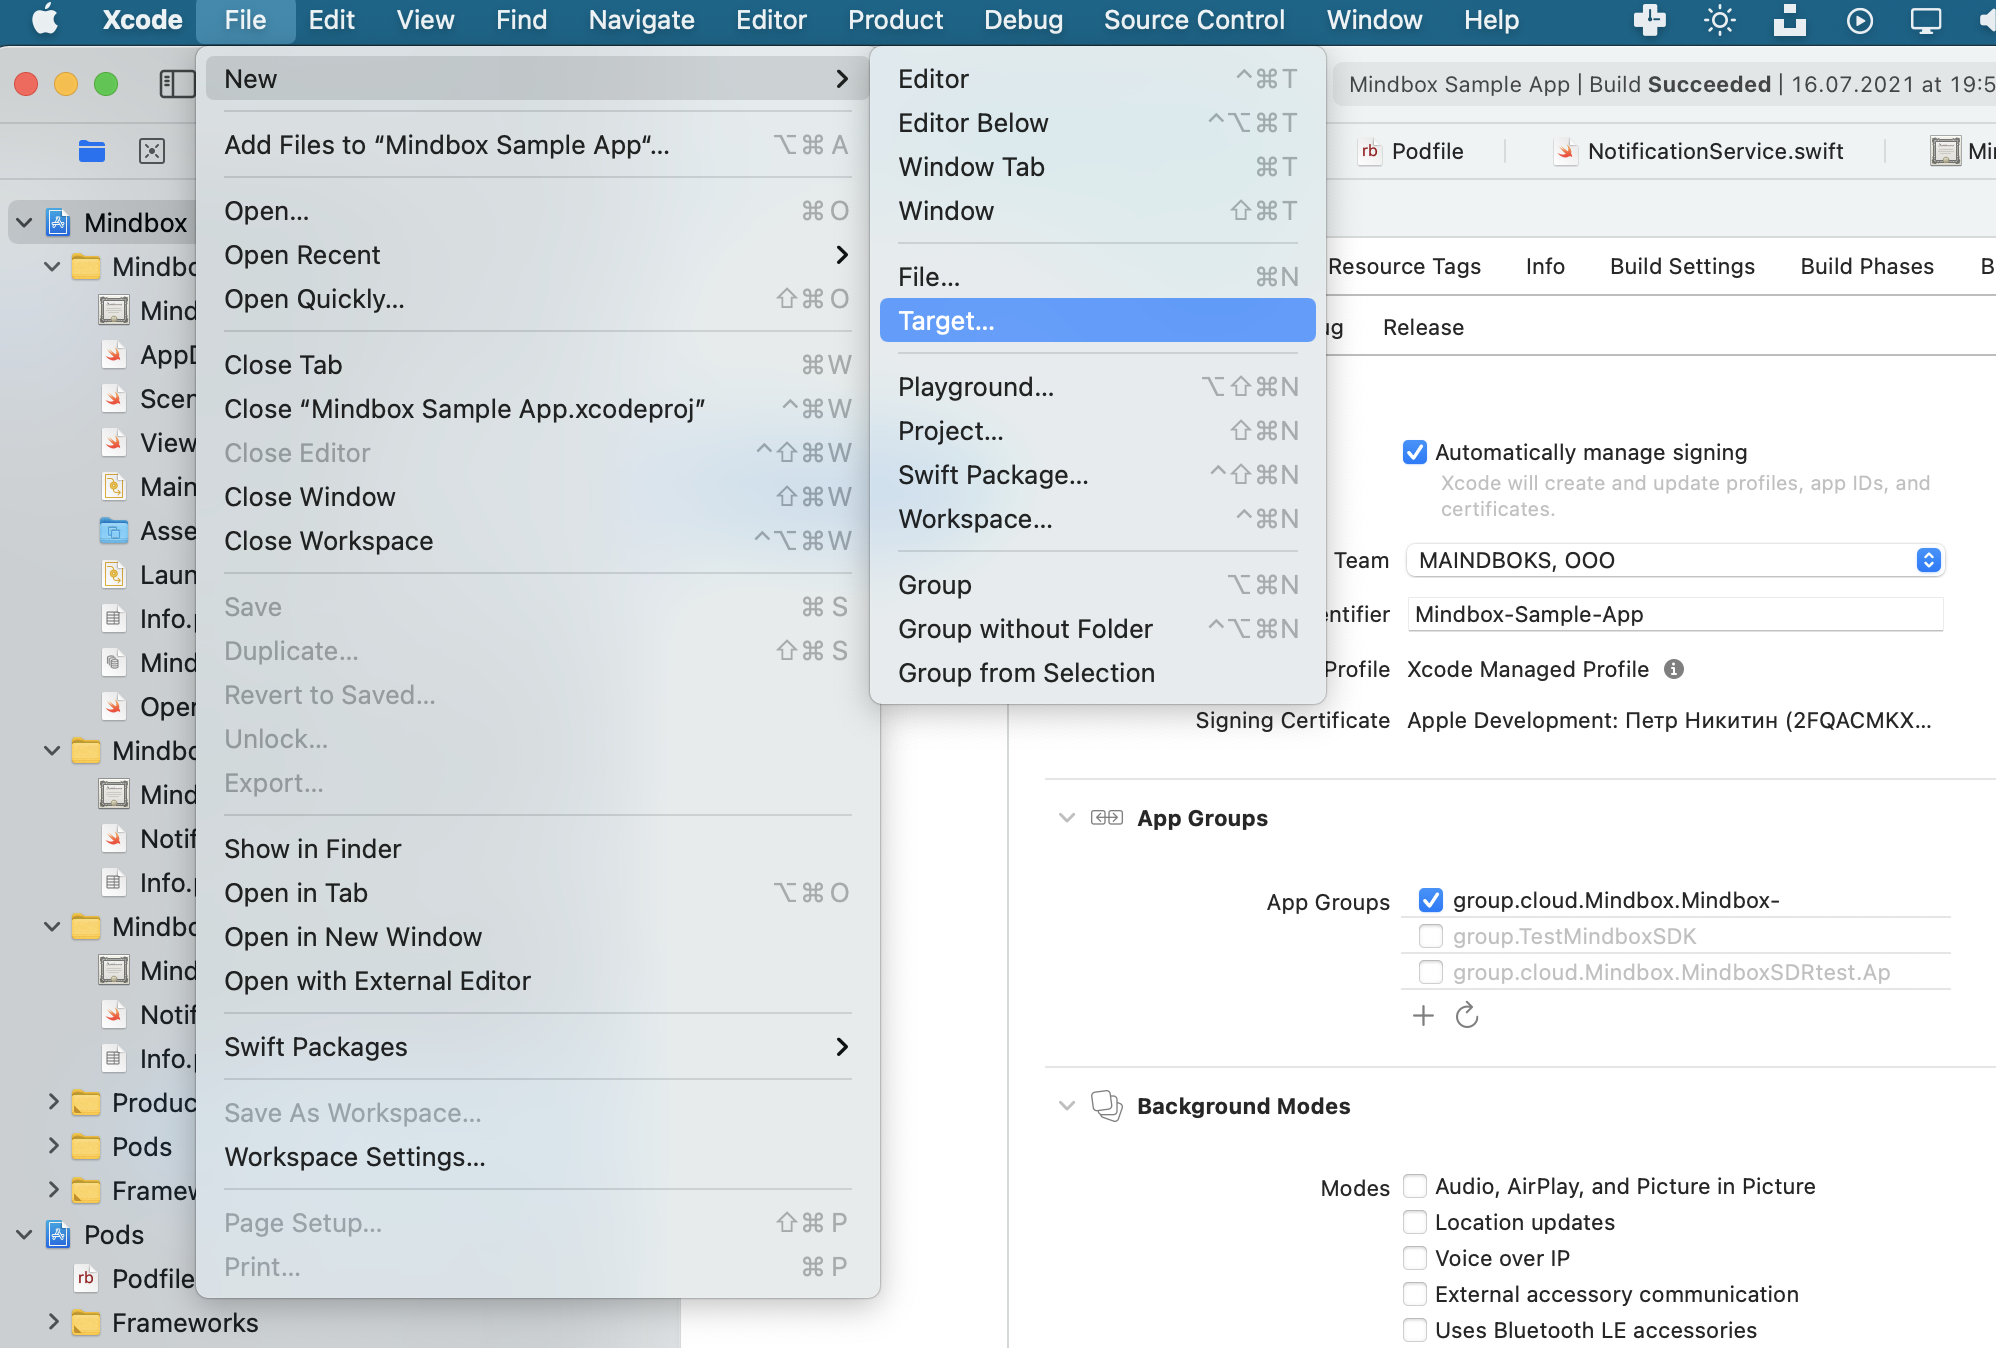
- Open Xcode and go to Select File → New → Target...:
- Select Notification Service Extension and click Next:
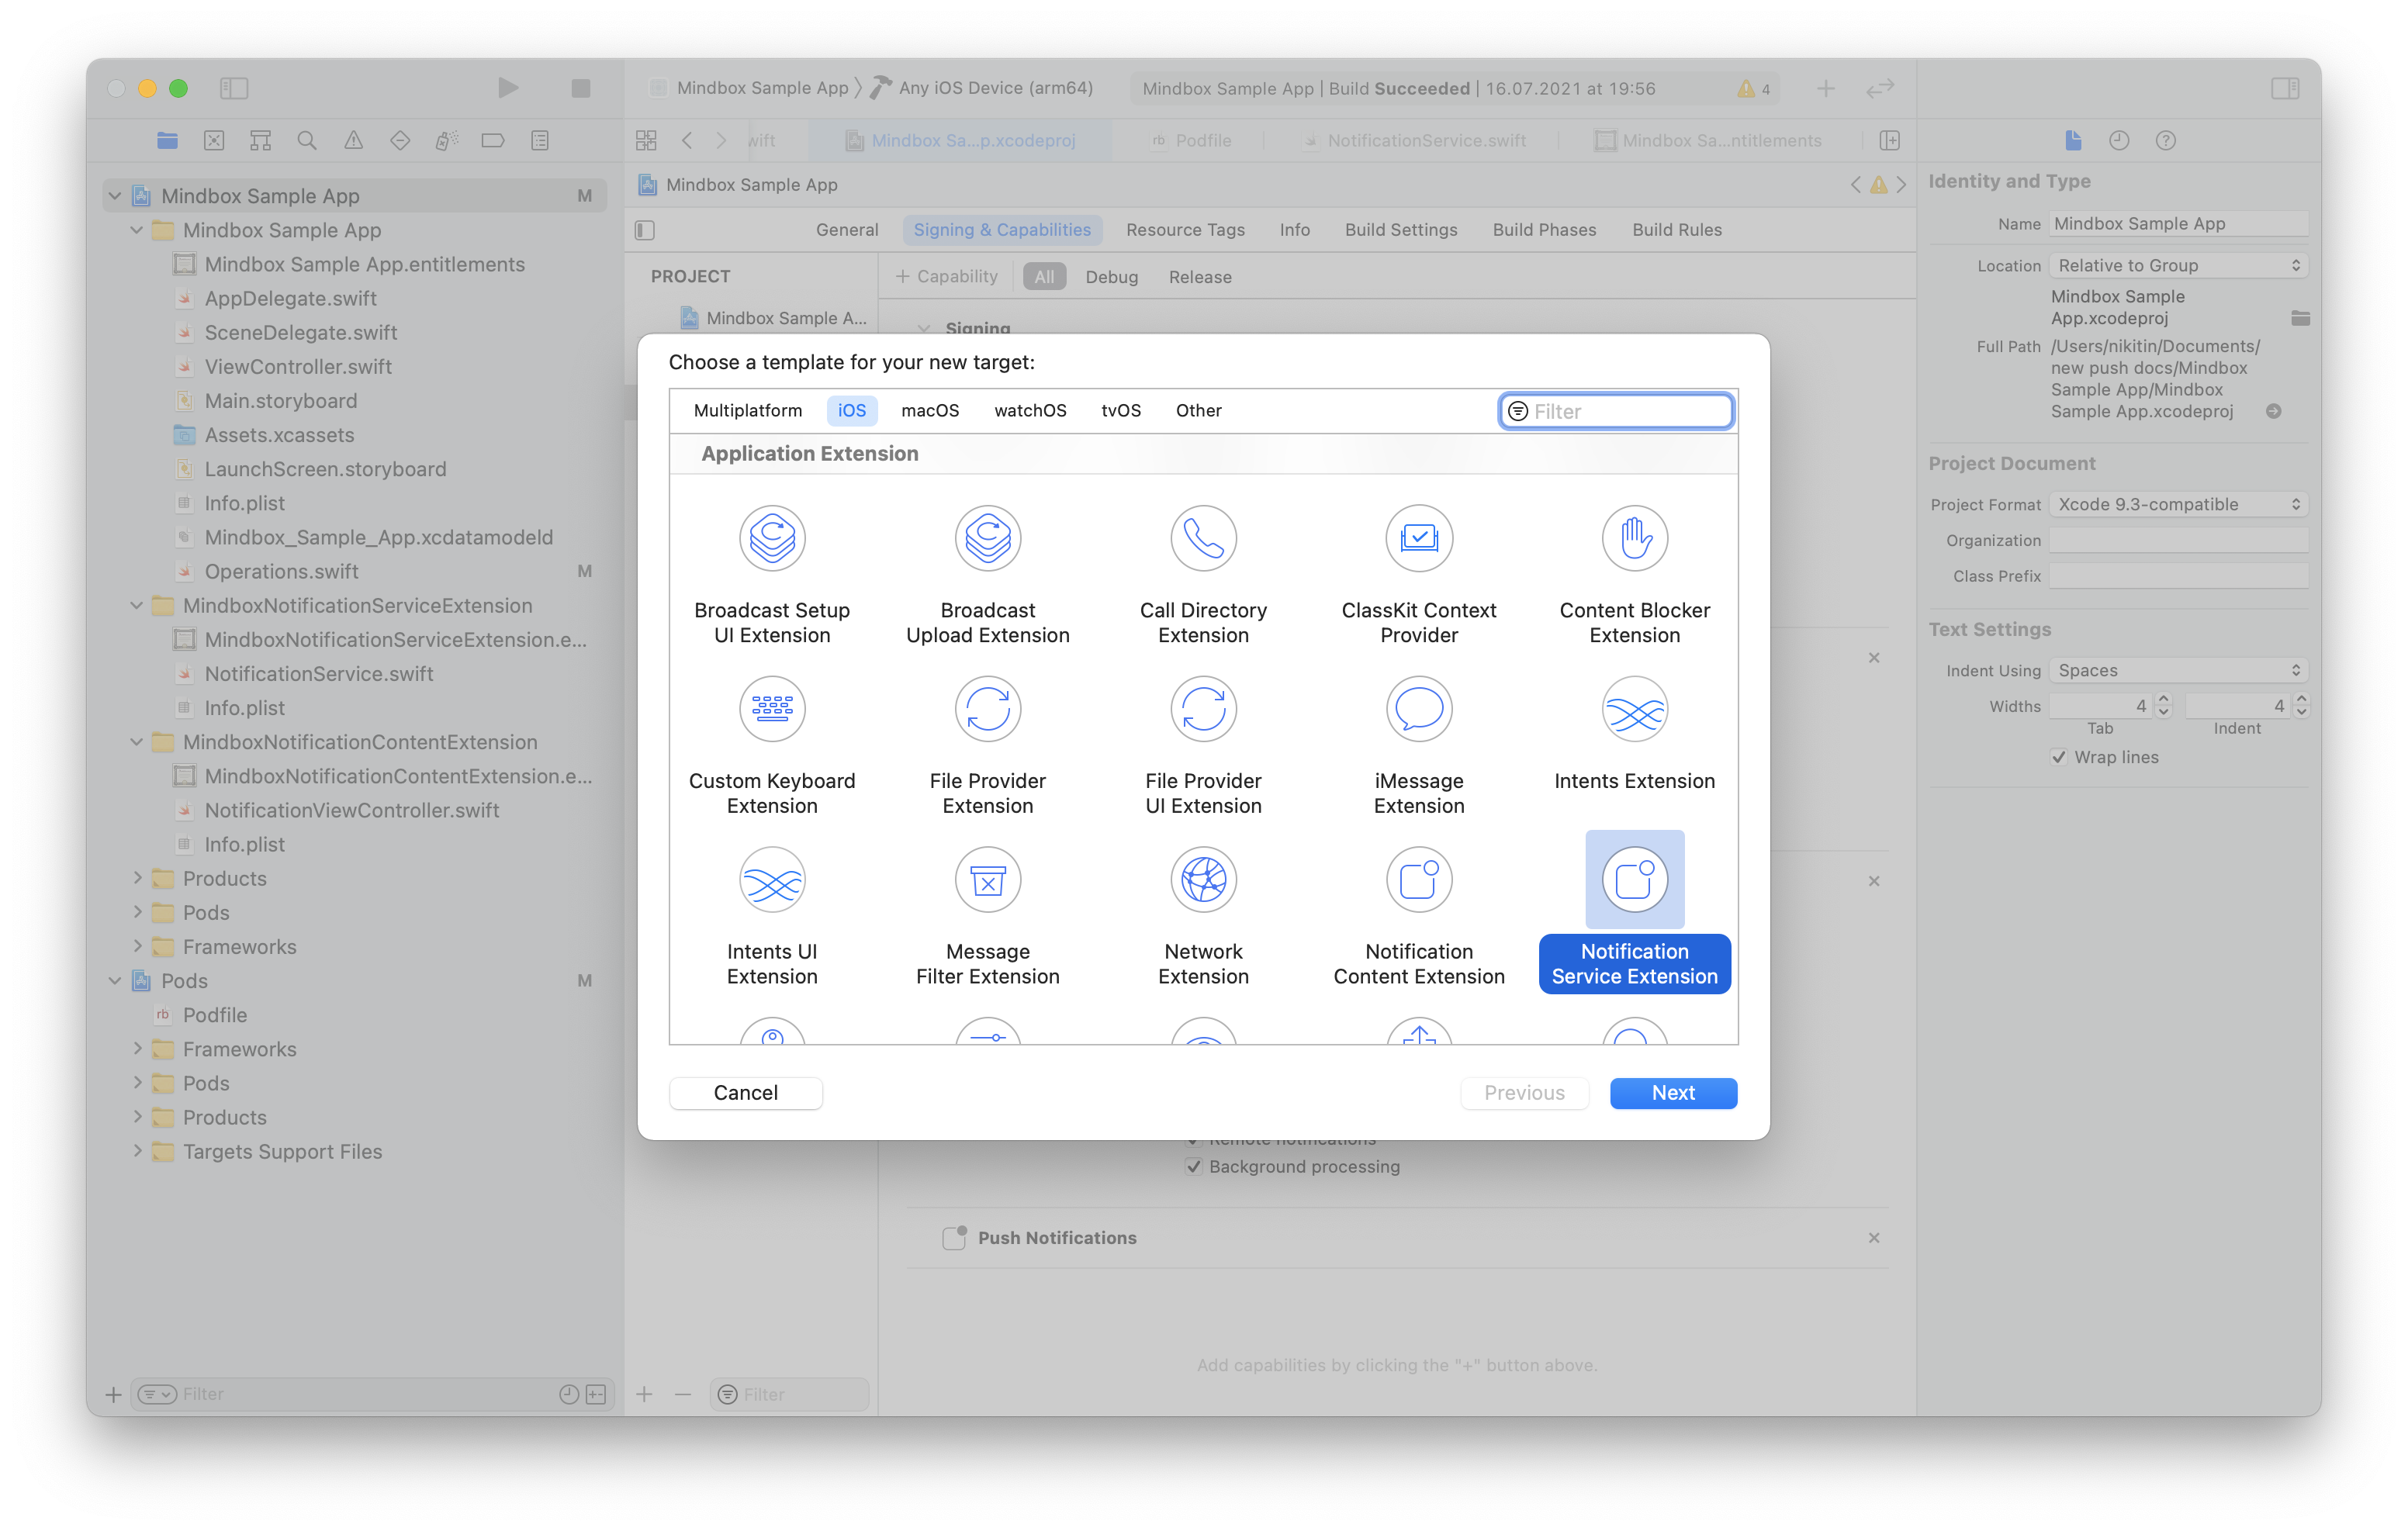
- Enter the Product name
MindboxNotificationServiceExtensionand click Finish. - Click Cancel in the Activate Scheme dialog box.
2. Setting up the extension
2.1. App Groups
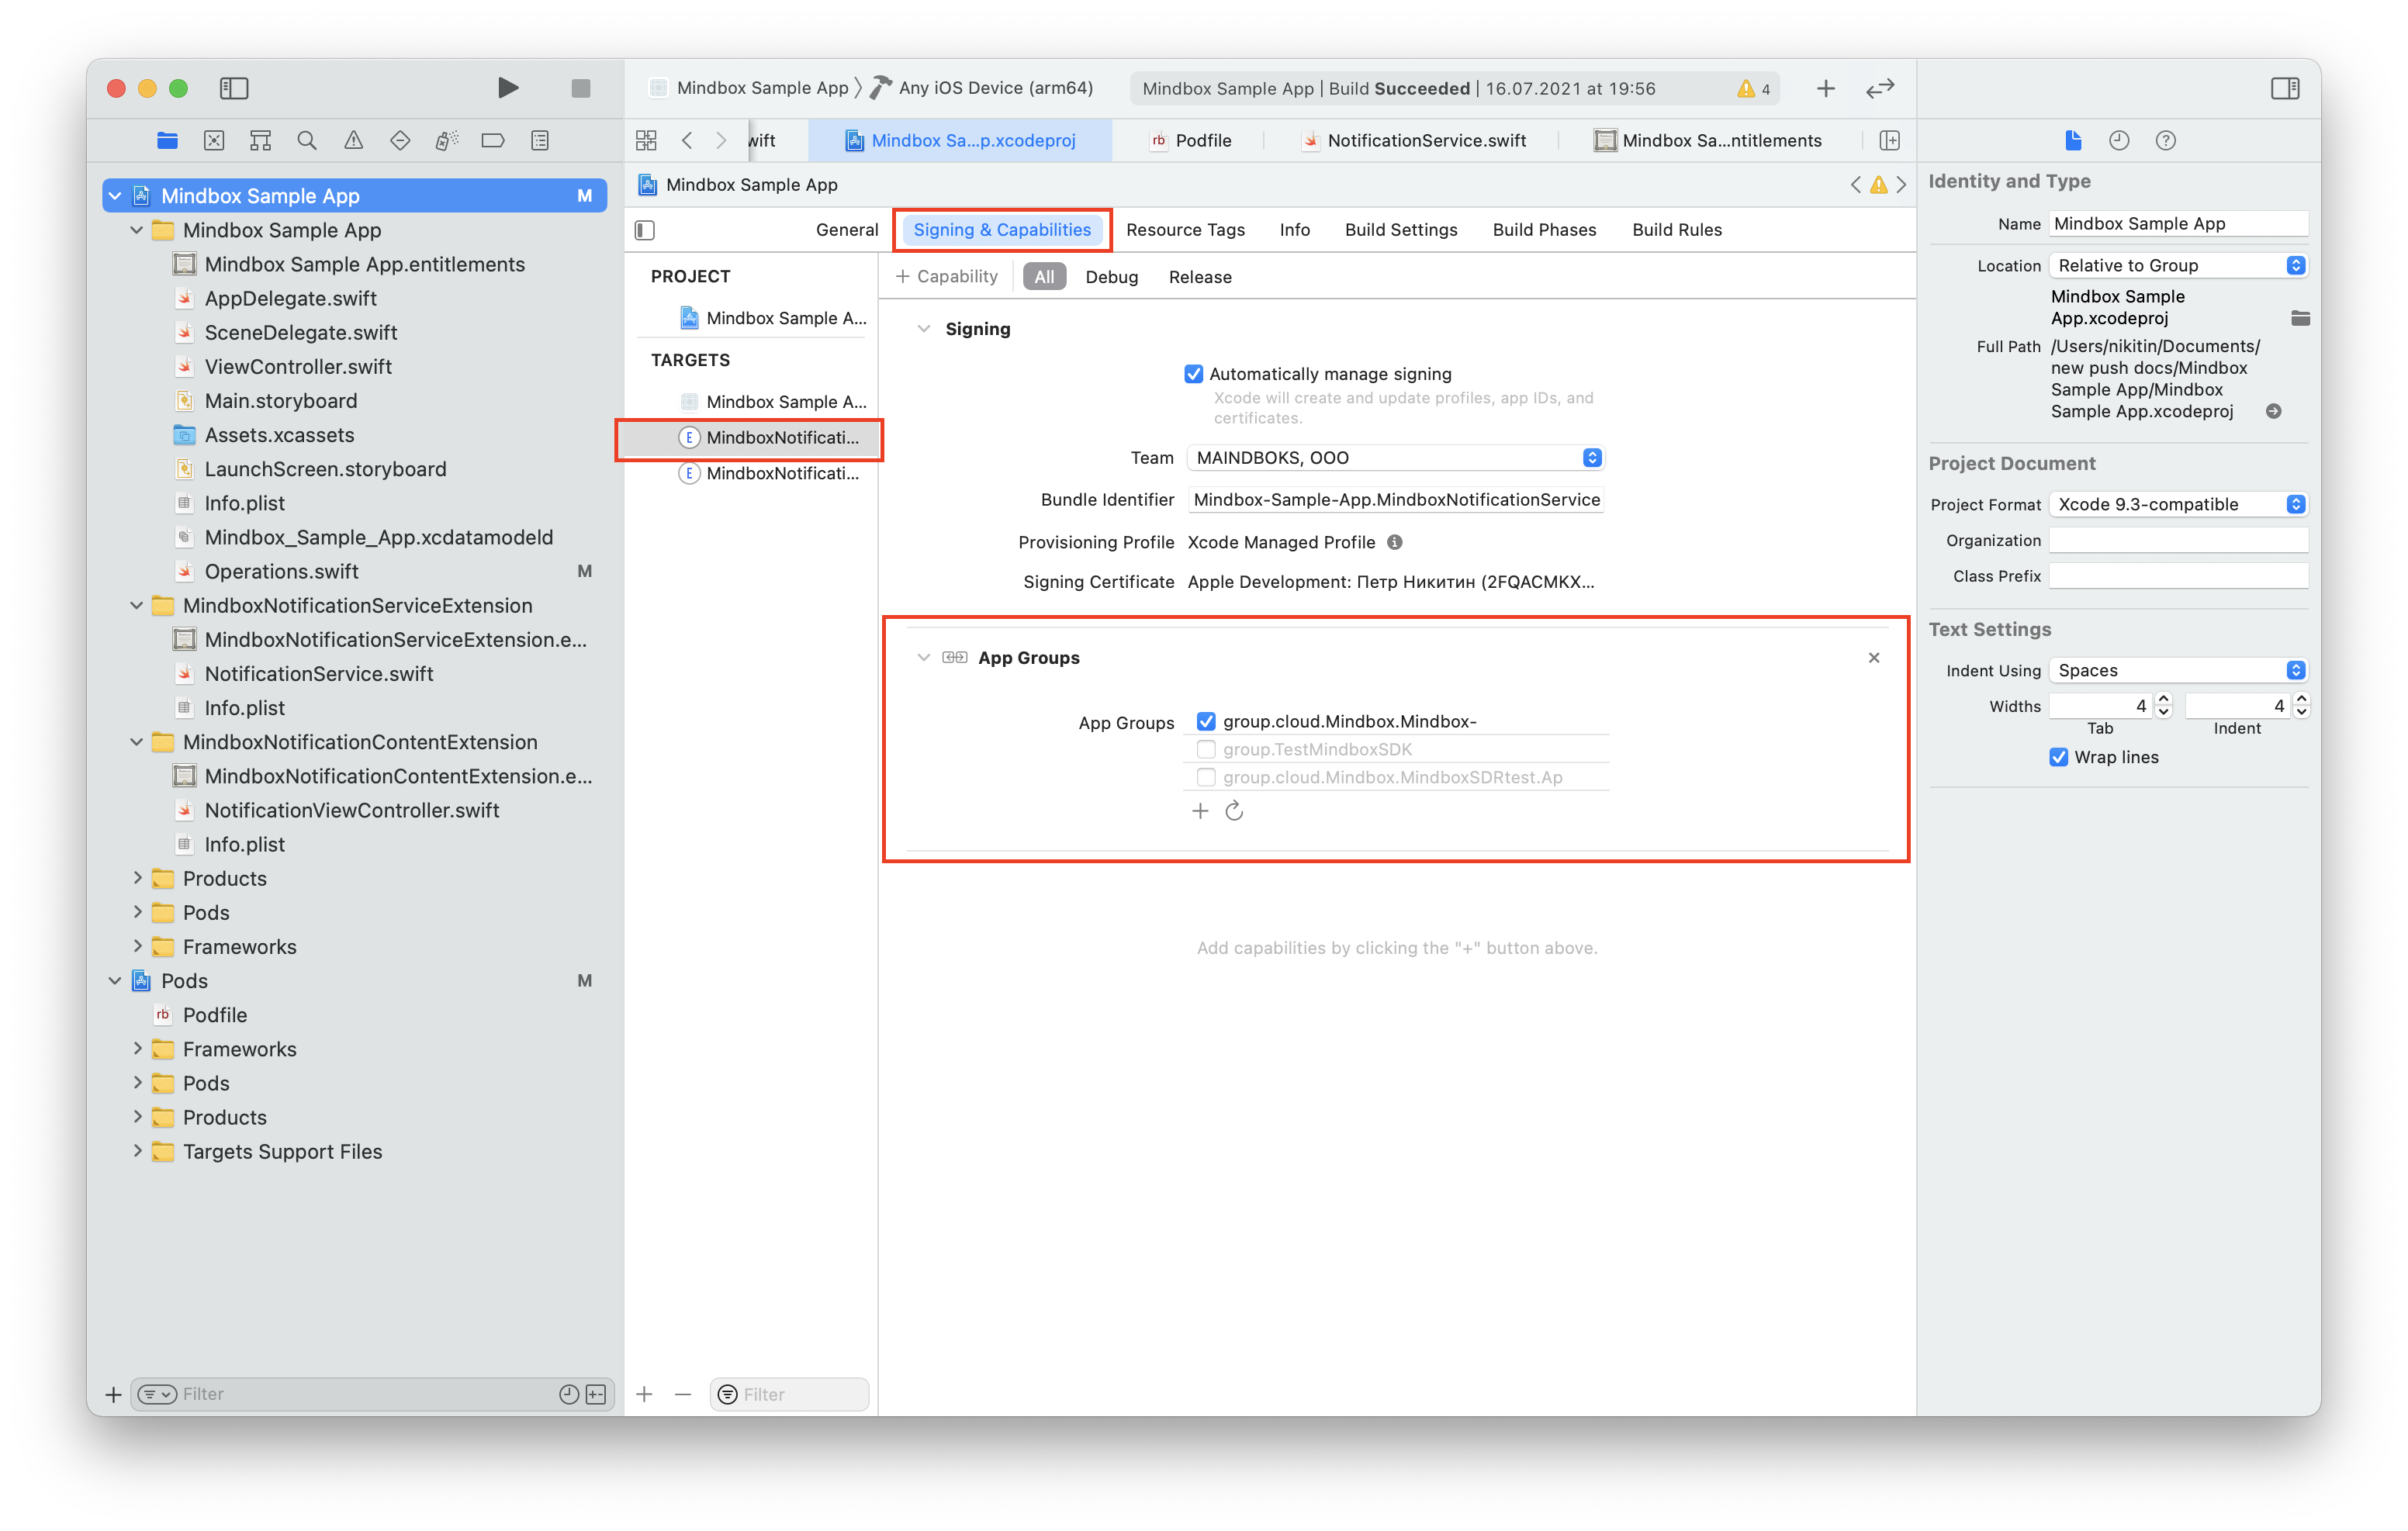
- Open the project settings.
- Select
MindboxNotificationServiceExtensionfrom the Targets. - Go to the
Signing & Capabilitiestab. - Click Add and select
App Groups. - Add a new group named as
group.cloud.Mindbox.{Bundle ID of your app}.
Example: with the app’s Bundle ID being Mindbox-Sample-App, name the relevant App Group as group.cloud.Mindbox.Mindbox-Sample-App.
Please note that you need to set up App Groups for Maestra’s SDK to workIf you skip App Groups setup, the extension will fail to work when a push notification is received (and this error is hard to detect).
2.3. Signing the extension
Sign the extension using the same certificate you used to sign the app. With auto-signing enabled, the signature will be applied automatically. If not, you will have to manually create certificates for your targets and publish them on the Signing & Capabilities tab.
Check your iOS Deployment Target releasesMake sure that your main Target, Service extension, and Content extension specify the same iOS Deployment Target.
3. Implementing the extension code
3.1. Adding the SDK to the extension
Adding MindboxNotifications using Cocoapods: Service Extension
Open the Podfile and add the guide below to ensure that Mindbox’s SDK is used by the extension:
....

use_frameworks!

....

target '<your application>' do
  # Comment the next line if you don't want to use dynamic frameworks
  pod 'Mindbox'
end

...

# --- NEW ----
# Pods for MindboxNotificationServiceExtension
target 'MindboxNotificationServiceExtension' do
   pod 'MindboxNotifications'
end

...
Adding MindboxNotifications using Carthage: Service Extension
Set upMindboxNotifications for MindboxNotificationsServiceExtension:
- Close Xcode with your project.
- Access your Project folder from the terminal:
cd path/to/project. - Run
touch Cartfileto create aCartfile. - Add the echo
'github "https://github.com/mindbox-cloud/ios-sdk.git"' → Cartfileto yourCartfile. - Run
carthage update --no-use-binaries --use-xcframeworks. For Xcode 11 or older, runcarthage update --no-use-binaries. Note that in the latter case all the .xcframework command examples should read as .framework. - Open your project in Xcode.
- Go to the Project settings to select your Target. Go to the
MindboxNotificationsServiceExtensiontab. - Drag the
MindboxNotifications.xcframeworkfor your Extension onto theFrameworks, Libraries, and Embedded Contenttab.
Set upMindboxNotifications for MindboxNotifcationsContentExtension:
- Close Xcode with your project.
- Access your project folder from the terminal
cd path/to/project. - Run touch
Cartfileto create aCartfile. - Add the
echo 'github "https://github.com/mindbox-cloud/ios-sdk.git"' → Cartfileto yourCartfile. - Run
carthage update --no-use-binaries --use-xcframeworks. For Xcode 11 or older, runcarthage update --no-use-binaries. Note that in the latter case all the .xcframework command examples should read as .framework. - Open your project in Xcode.
- Go to the Project settings to select your Target. Go to the
MindboxNotifcationsContentExtensiontab. - Drag
MindboxNotifications.xcframeworkfor your Extension onto theFrameworks, Libraries, and Embedded Contenttab.
Adding MindboxNotifications using Swift Package Manager: Service Extension
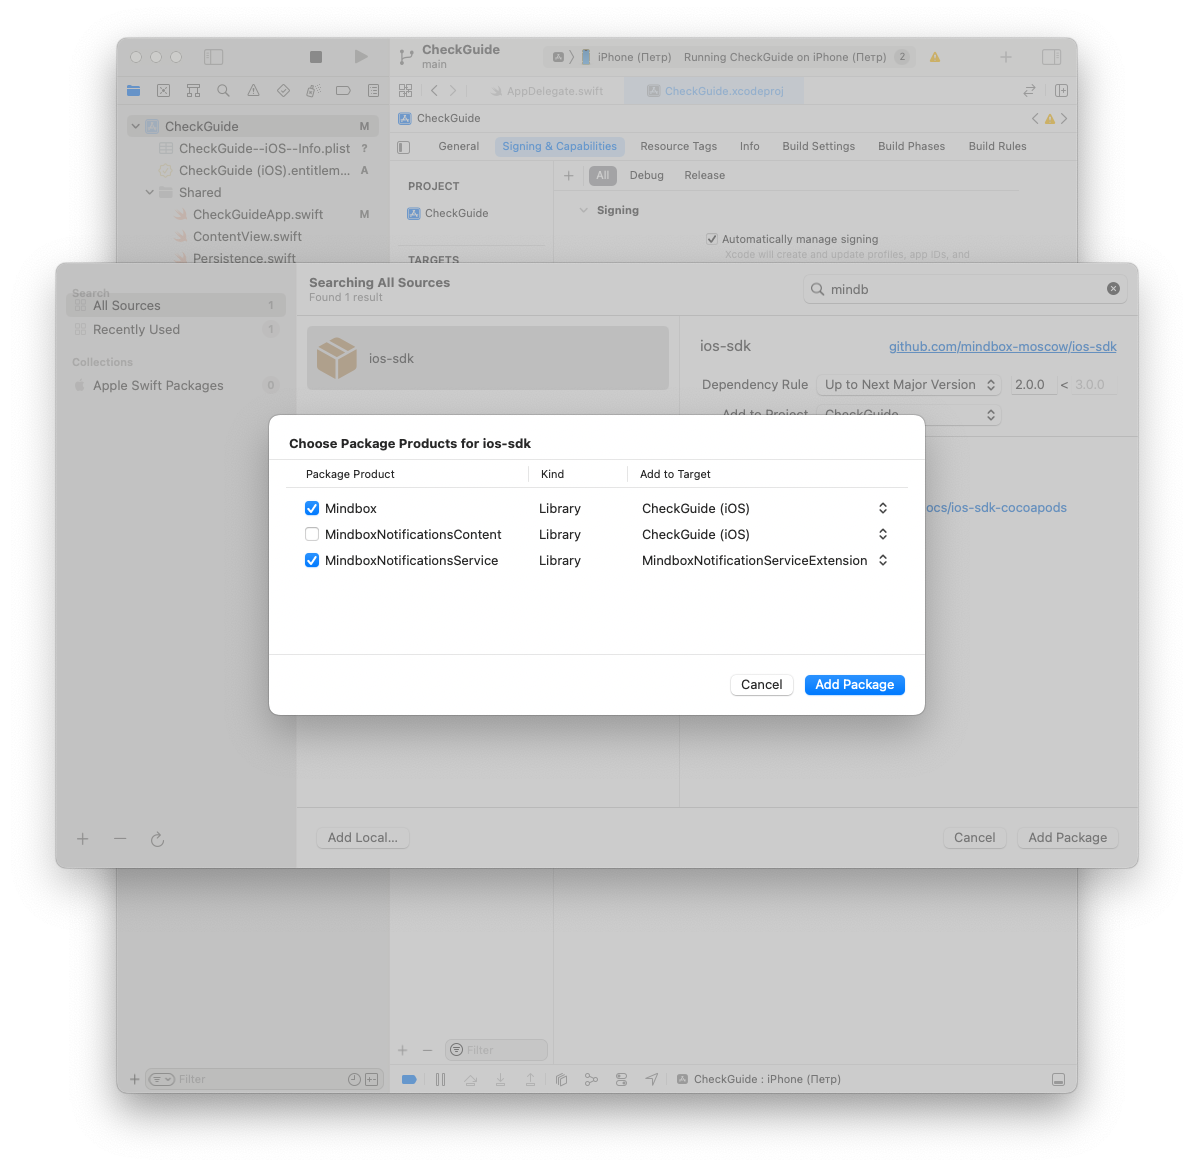
- Open Xcode and go to
File → Add Packages...from the top menu. - Enter the URL to Mindbox’s SDK
https://github.com/mindbox-cloud/ios-sdkin the window that appears. - Select version 1.3.3 or higher to support the Swift Package Manager and click Add Package.
- Once the package has been downloaded, specify your target:
- add
Mindboxto the main project target, - add
MindboxNotificationsServicetoMindboxNotificationServiceExtension.
- add
3.2. Implementing the extension code in your app
A basic way to implement the extension code into an app that will work if:
- your app uses Mindbox push notifications only;
- you need to integrate the code ASAP.
Open the main extension file to perform the following:
- import the MindboxNotifications library;
- call the
MindboxNotificationService()method; - add 2 method calls:
didReceiveandserviceExtensionTimeWillExpire.
Simple implementation example:
import UserNotifications
import MindboxNotifications

class NotificationService: UNNotificationServiceExtension {

  lazy var mindboxService = MindboxNotificationService()

  override func didReceive(_ request: UNNotificationRequest, withContentHandler contentHandler: @escaping (UNNotificationContent) -> Void) {
    mindboxService.didReceive(request, withContentHandler: contentHandler)
  }

  override func serviceExtensionTimeWillExpire() {
    // Called just before the extension will be terminated by the system.
    // Use this as an opportunity to deliver your "best attempt" at modified content, otherwise the original push payload will be used.
    mindboxService.serviceExtensionTimeWillExpire()
  }
}`
An advanced method to implement the extension code into an app that it works if:
- you use multiple mailing providers;
- you need to implement a unique way to process notifications;
- you need to process the payload data;
- you apply a custom Content Extension.
How to apply the advanced method:
- Call
MindboxNotificationService()to access open-source API methods; - Check if the uniqueKey field is empty in your push notification. If it is not empty, the notification is probably from Mindbox, so call
mindboxService.pushDelivered(request)to notify Mindbox that its push notification has been received. If this push notification was not from Mindbox, the receipt notification will be ignored; - Implement push notification processing using one of the following methods:
- Apply the
MindboxNotificationService()methods from the example above; - Process all the fields in the push notification manually. Use the iOS push notification format.
- Apply the
Example with minimum code, without content processing:
import UserNotifications
import MindboxNotifications

class NotificationService: UNNotificationServiceExtension {

  lazy var mindboxService = MindboxNotificationService()

  var contentHandler: ((UNNotificationContent) -> Void)?
  var bestAttemptContent: UNMutableNotificationContent?

  override func didReceive(_ request: UNNotificationRequest, withContentHandler contentHandler: @escaping (UNNotificationContent) -> Void) {

    if(request.content.userInfo["uniqueKey"] as? String != nil) {
      mindboxService.pushDelivered(request)
    }

    self.contentHandler = contentHandler
    self.bestAttemptContent = (request.content.mutableCopy() as? UNMutableNotificationContent)

    guard let bestAttemptContent = self.bestAttemptContent else { return }
    contentHandler(bestAttemptContent)
  }


  override func serviceExtensionTimeWillExpire() {
    // Called just before the extension will be terminated by the system.
    // Use this as an opportunity to deliver your "best attempt" at modified content, otherwise the original push payload will be used.
    if let contentHandler = contentHandler, let bestAttemptContent =  bestAttemptContent {
      contentHandler(bestAttemptContent)
    }

  }
}
Check that push notifications with images are sent correctly.
Displaying buttons
This step will help you to:Set up mobile push notifications to display buttons when expanded.
To check that buttons appear when a push notification is tapped, please refer to this guide.
To enable buttons to be displayed in push notifications, you’ll need to add the Notification Content extension.
1. Adding the extension
- Open Xcode and click Select File → New → Target...:
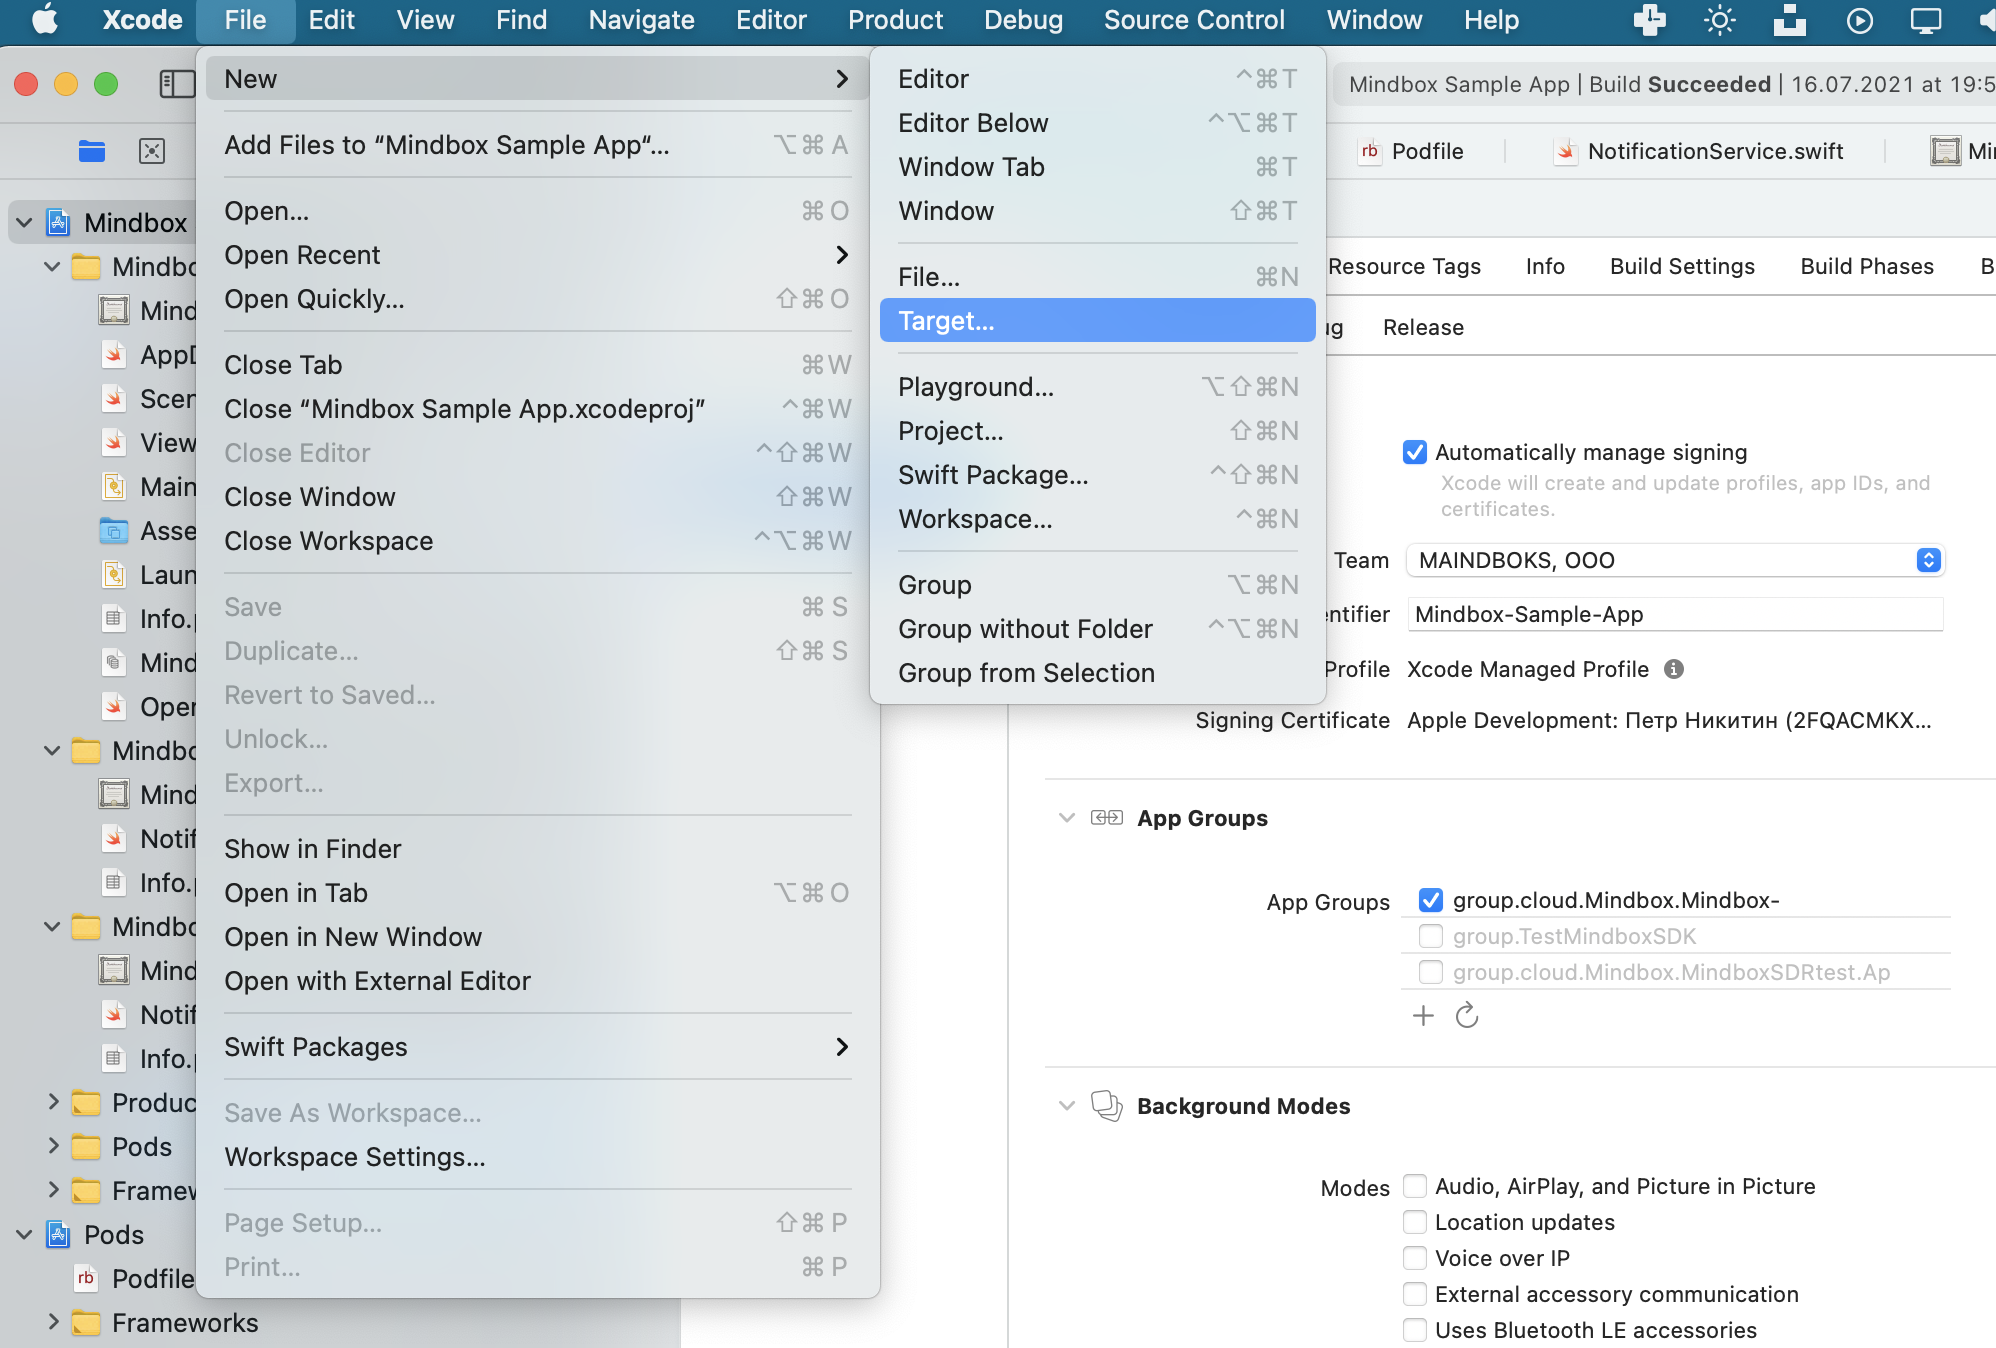
- Click Notification Content Extension and then Next:
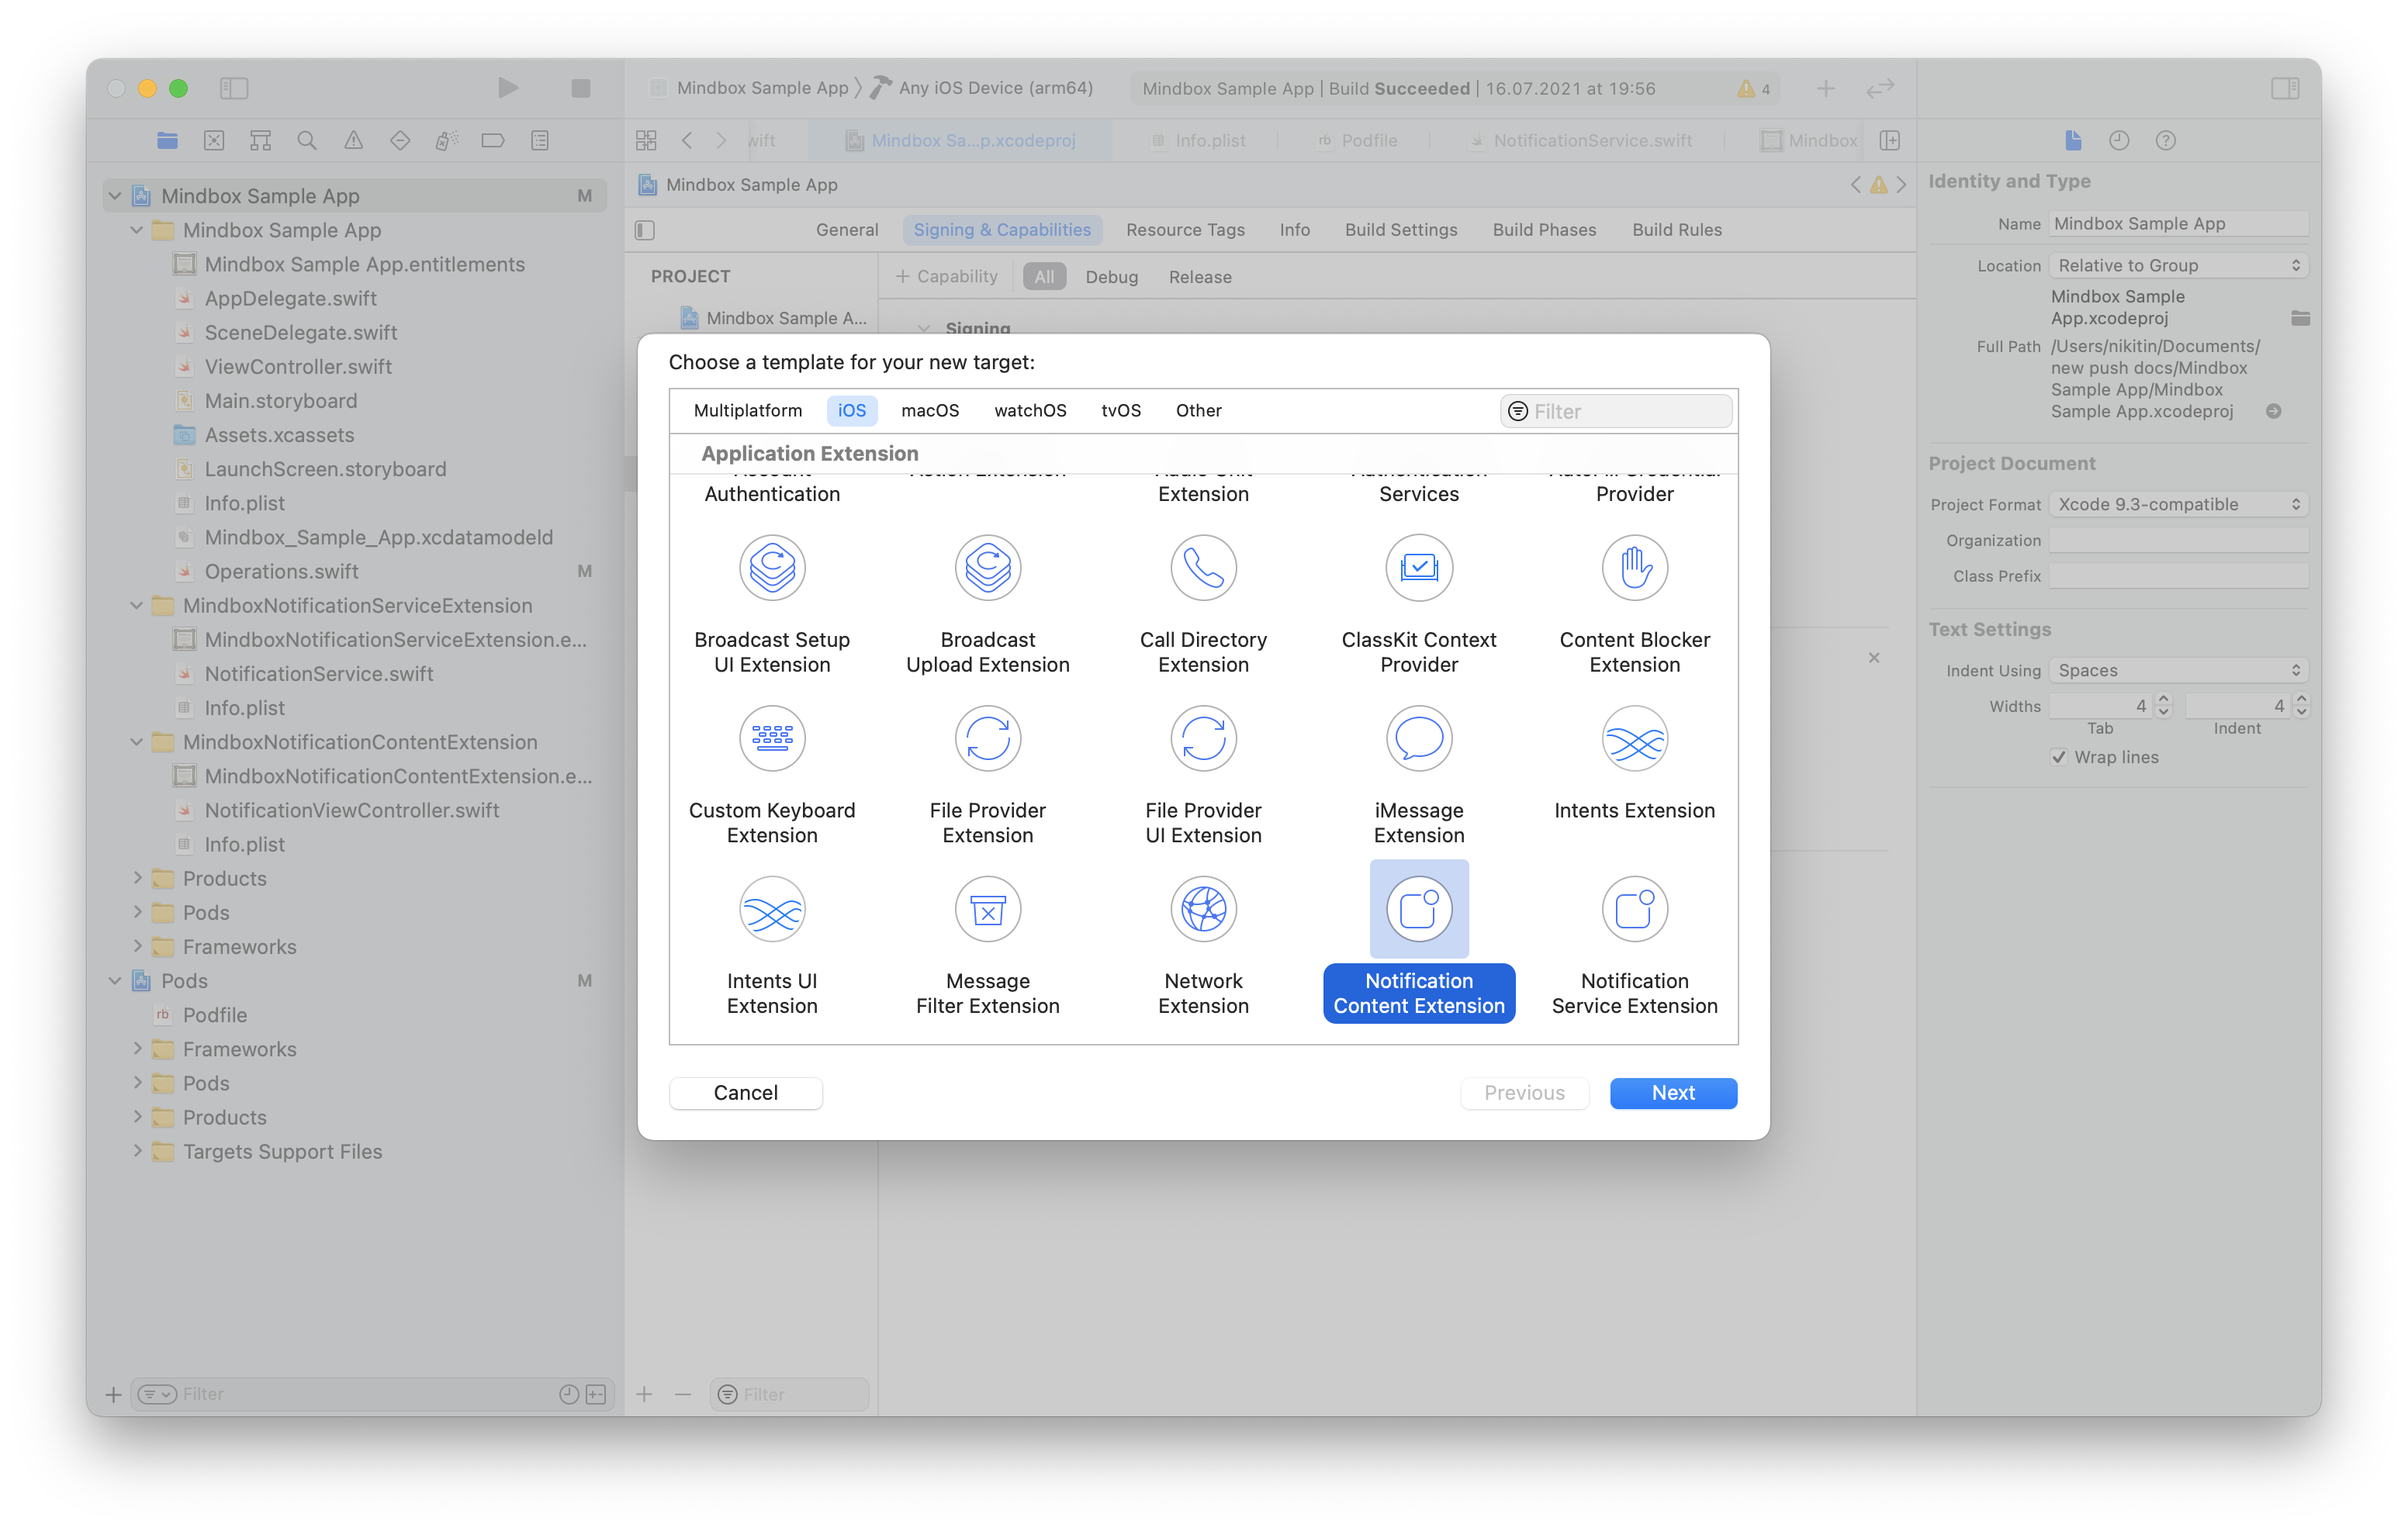
- Enter
MindboxNotificationContentExtensionfor the Product name and click Finish. - Click Cancel in the Activate Scheme window.
2. Setting up the extension
2.1. App Groups
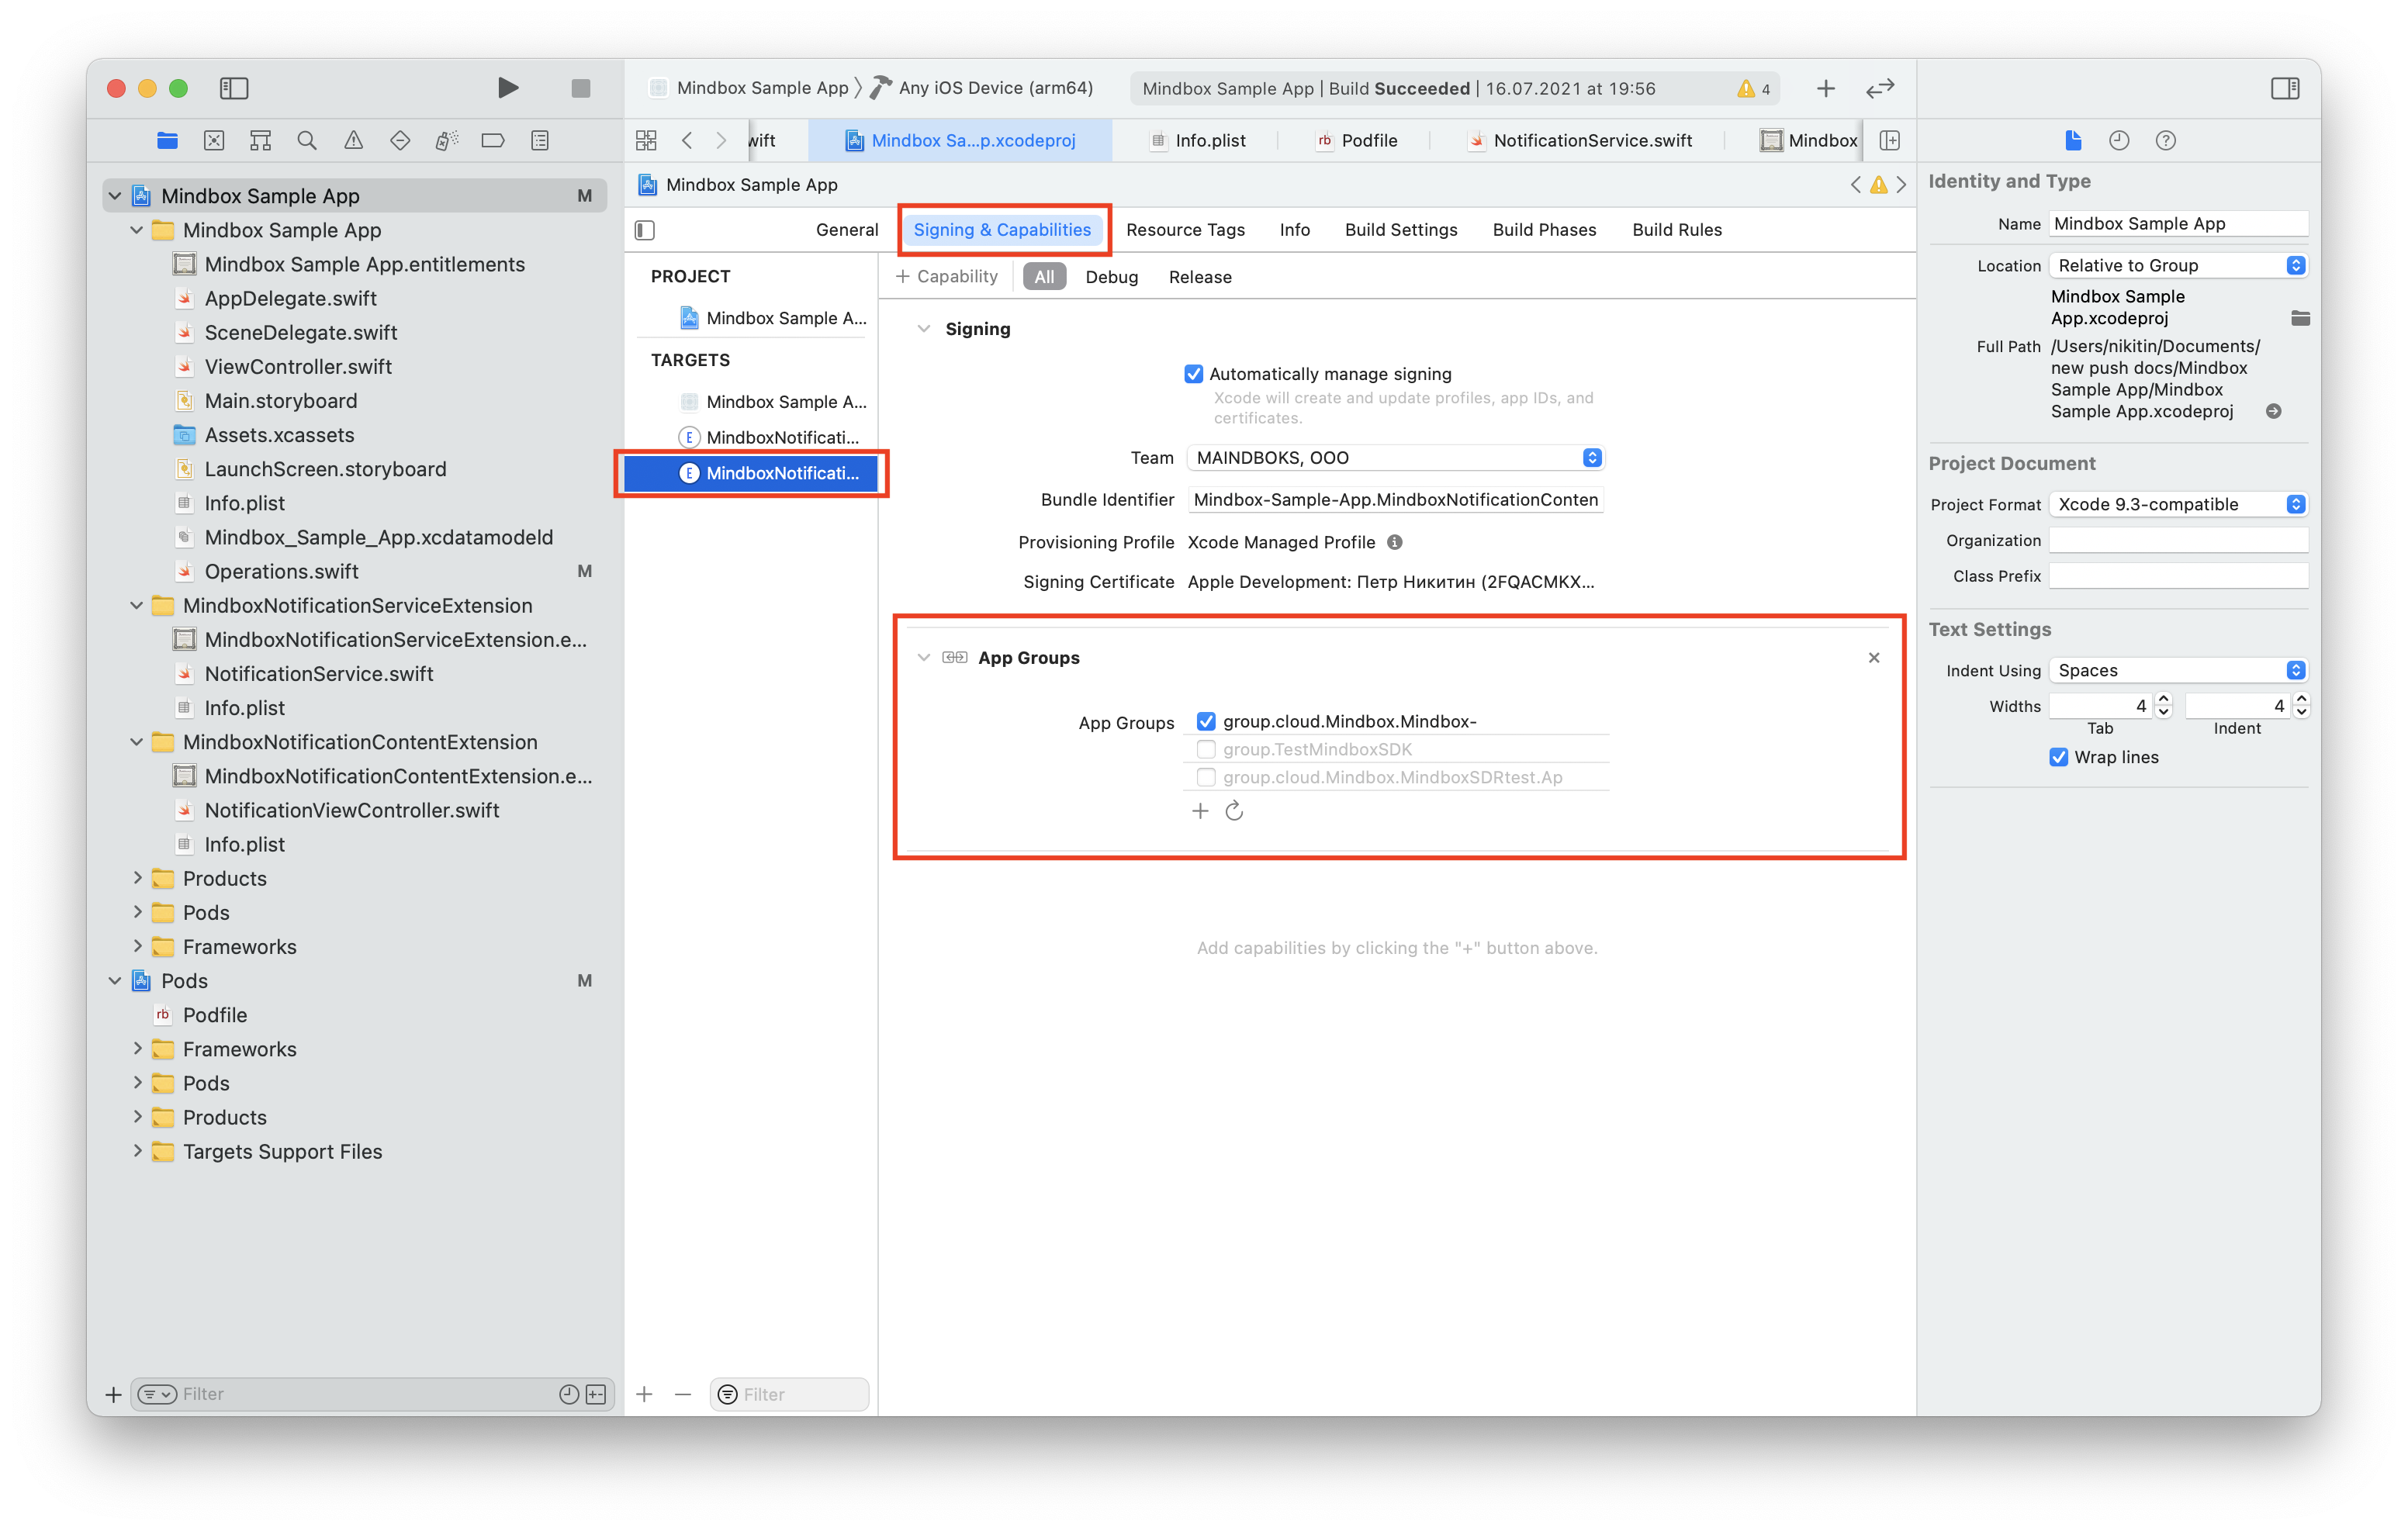
- Open the project settings.
- Select
MindboxNotificationServiceExtensionfrom the Targets. - Go to the
Signing & Capabilitiestab. - Click Add and select
App Groups. - Add a new group named as
group.cloud.Mindbox.{Bundle ID of your app}.
Example: if the app’s Bundle ID is Mindbox-Sample-App, the App Group name must be group.cloud.Mindbox.Mindbox-Sample-App.
Please note that you need to set up App Groups for Mindbox’s SDK to workIf you skip App Groups setup, the extension will fail to work when a push notification is received (and this error is hard to detect).
2.2. Signing the extension
Sign the extension using the same certificate you used to sign the app. With auto-signing enabled, the signature will be applied automatically. If not, you will have to manually create certificates for your targets and publish them on the Signing & Capabilities tab.
Check your iOS Deployment Target releasesMake sure that your main Target, Service extension, and Content extension specify the same iOS Deployment Target.
3. Implementing the extension code
3.1. Adding SDK to the extension
Adding MindboxNotifications using Cocoapods: Content Extension
Open the Podfile and add the guide below to ensure that Mindbox’s SDK is used by the extension.
....

use_frameworks!

....

target '<your application>' do
  # Comment the next line if you don't want to use dynamic frameworks
  pod 'Mindbox'
end

...

# Pods for MindboxNotificationServiceExtension
target 'MindboxNotificationServiceExtension' do
   pod 'MindboxNotifications'
end

...

# ---- NEW ----
# Pods for MindboxNotificationContentExtension
target 'MindboxNotificationContentExtension' do
   pod 'MindboxNotifications'
end

...
Adding MindboxNotifications using Carthage: Content Extension
Set upMindboxNotifications for MindboxNotificationsContentExtension:
- Close Xcode with your project.
- Access your Project folder from the terminal:
cd path/to/project. - Run
touch Cartfileto create aCartfile. - Add the echo
'github "https://github.com/mindbox-cloud/ios-sdk.git"' → Cartfileto yourCartfile. - Run
carthage update --no-use-binaries --use-xcframeworks. For Xcode 11 or older, runcarthage update --no-use-binaries. Note that in the latter case all the .xcframework command examples should read as .framework. - Open your project in Xcode.
- Go to the Project settings to select your Target. Go to the
MindboxNotificationsContentExtensiontab. - Drag the
MindboxNotifications.xcframeworkfor your Extension onto theFrameworks, Libraries, and Embedded Contenttab.
Adding MindboxNotifications using Swift Package Manager: Content Extension
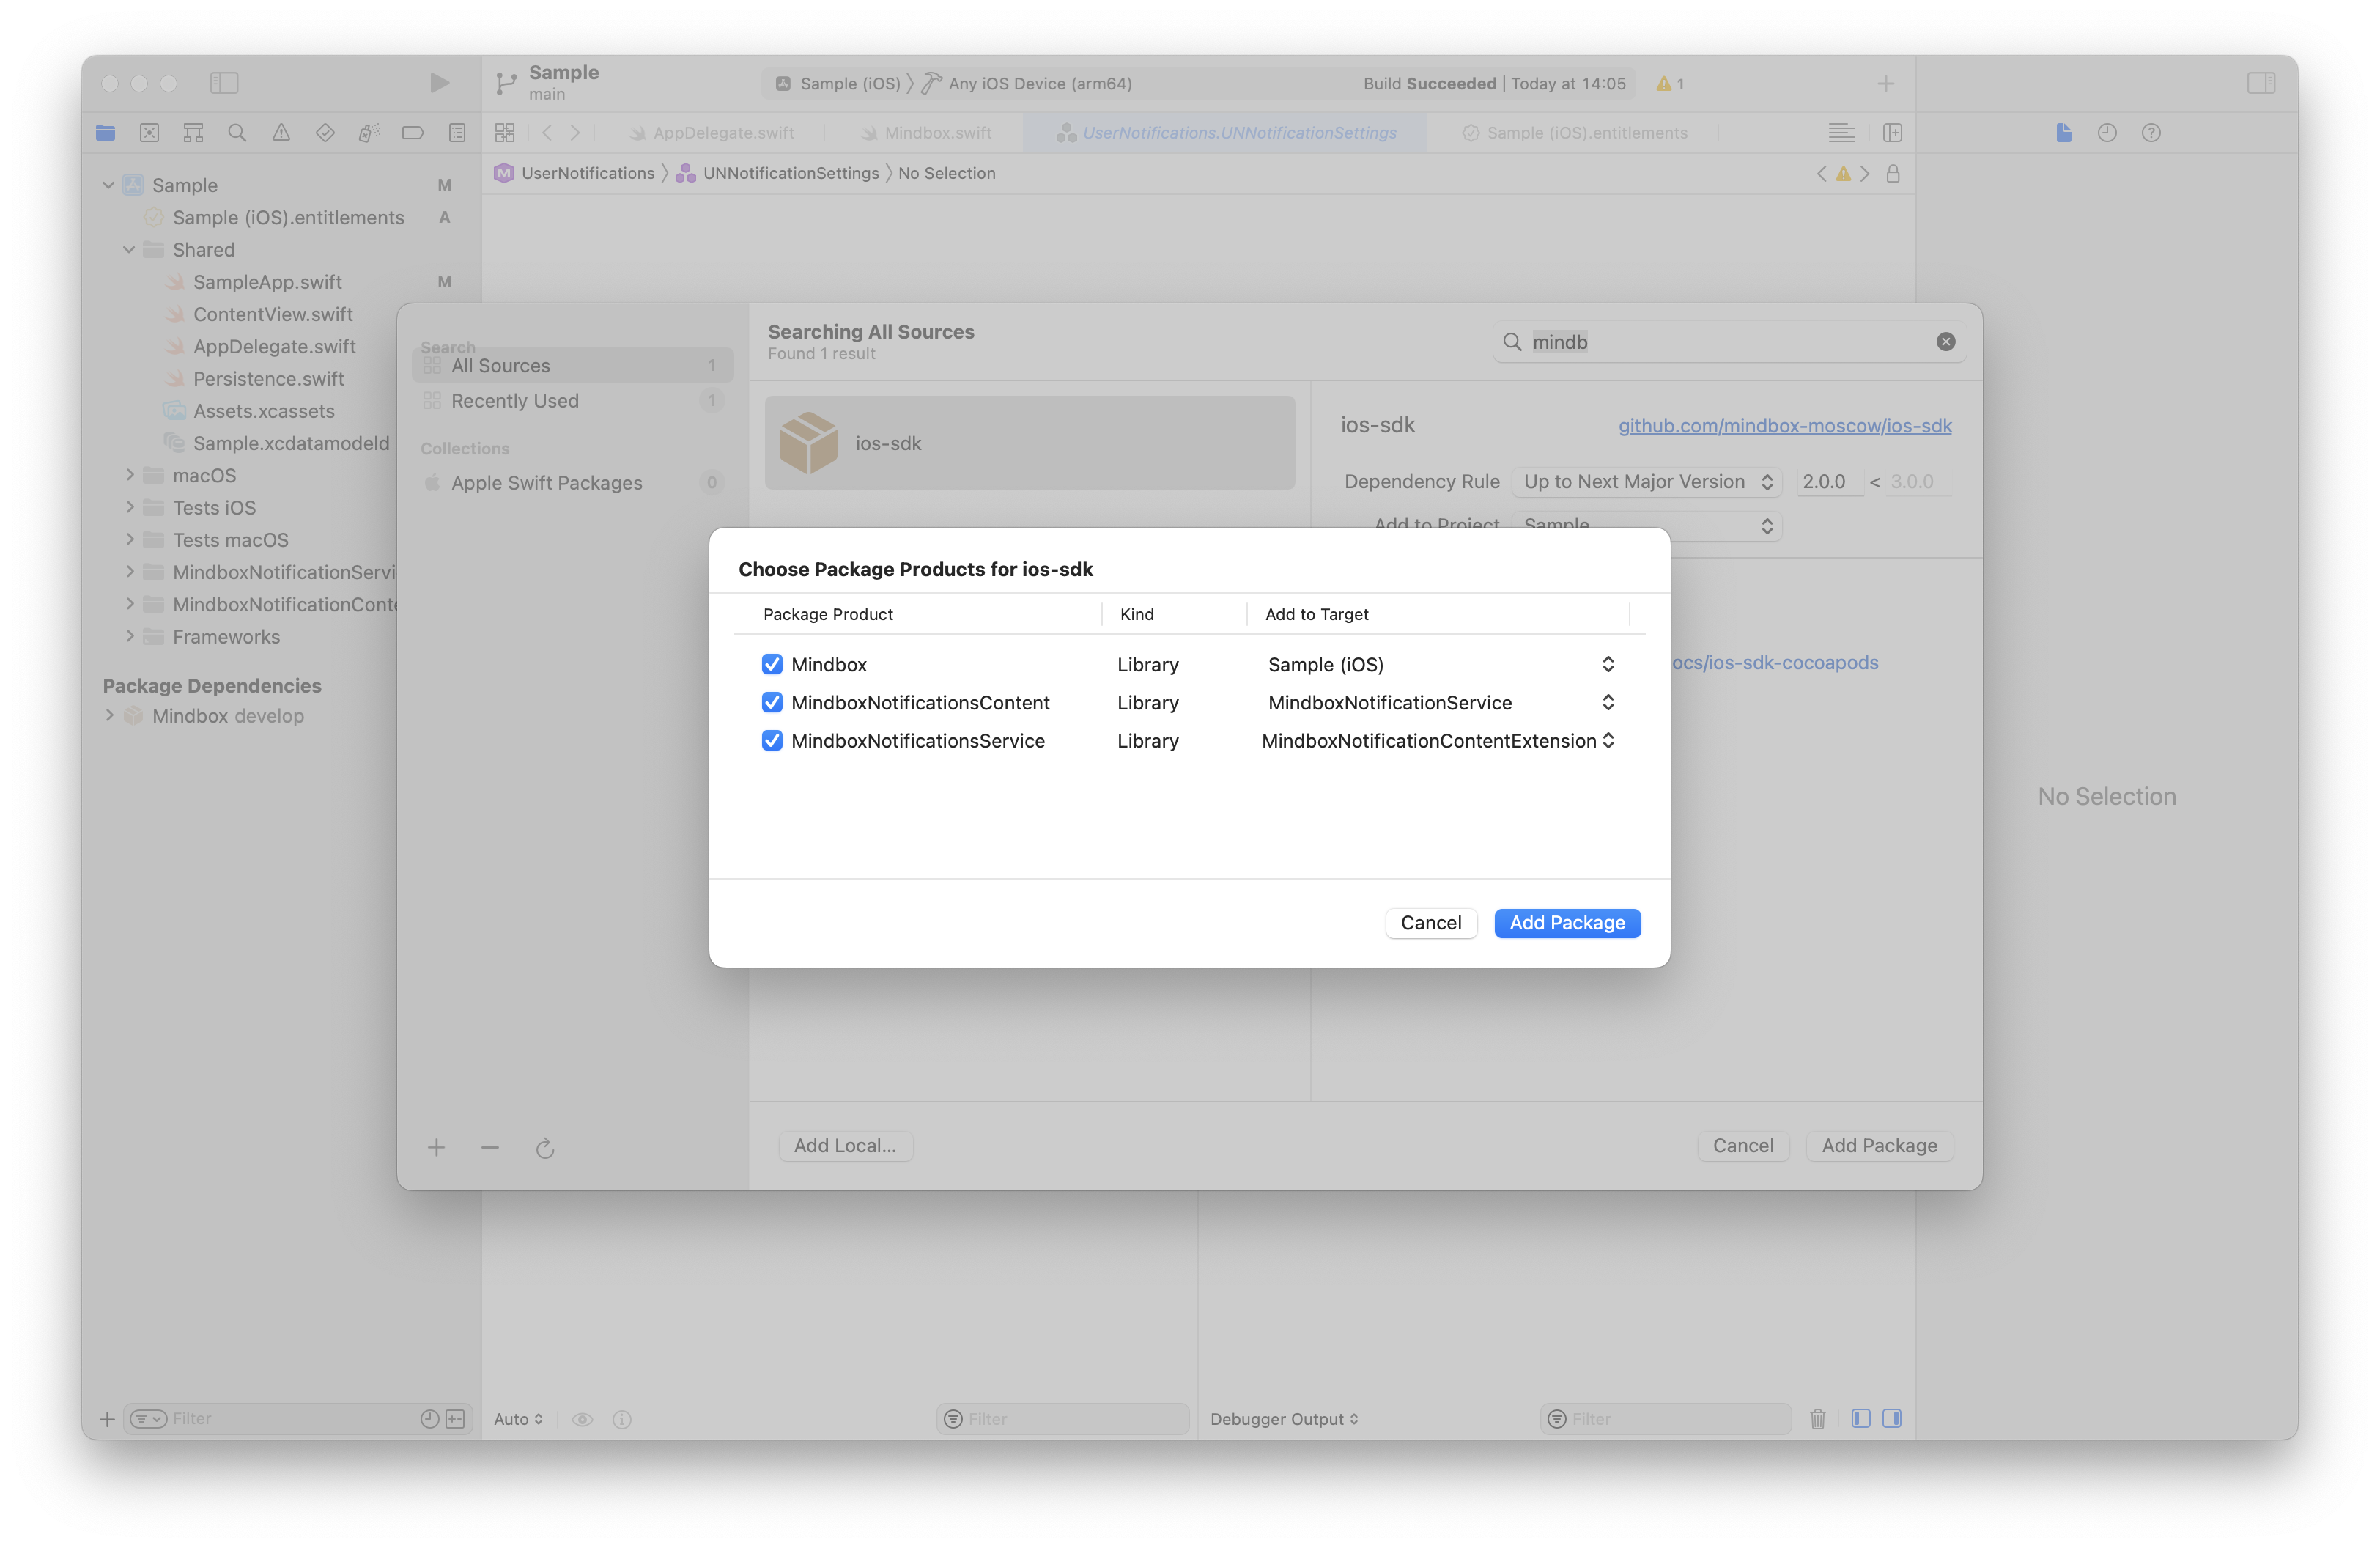
- Open Xcode and go to
File →Add Packages...from the upper menu. - Enter the URL to Mindbox’s SDK
https://github.com/mindbox-cloud/ios-sdkin the window that appears. - Select version 1.3.3 or higher to support the Swift Package Manager and click Add Package.
- Once the package has been downloaded, specify your target:
- add
Mindboxto the main project target, - add
MindboxNotificationsContenttoMindboxNotificationContentExtension.
- add
3.2. Implementing the extension code in your app
This is a basic way to implement the extension code into an app that will work if:
- your app uses Mindbox push notifications only;
- you need to integrate the code ASAP.
Simply follow these 2 steps:
- Import the library into
NotificationViewController.swiftand call theMindboxNotificationService()API method from the file; - Adjust your settings in
info.plist.
Example of the basic implementation method:
import UIKit
import UserNotifications
import UserNotificationsUI
import MindboxNotifications

class NotificationViewController: UIViewController, UNNotificationContentExtension {

  lazy var mindboxService = MindboxNotificationService()

  func didReceive(_ notification: UNNotification) {
    mindboxService.didReceive(notification: notification, viewController: self, extensionContext: extensionContext)
  }

}
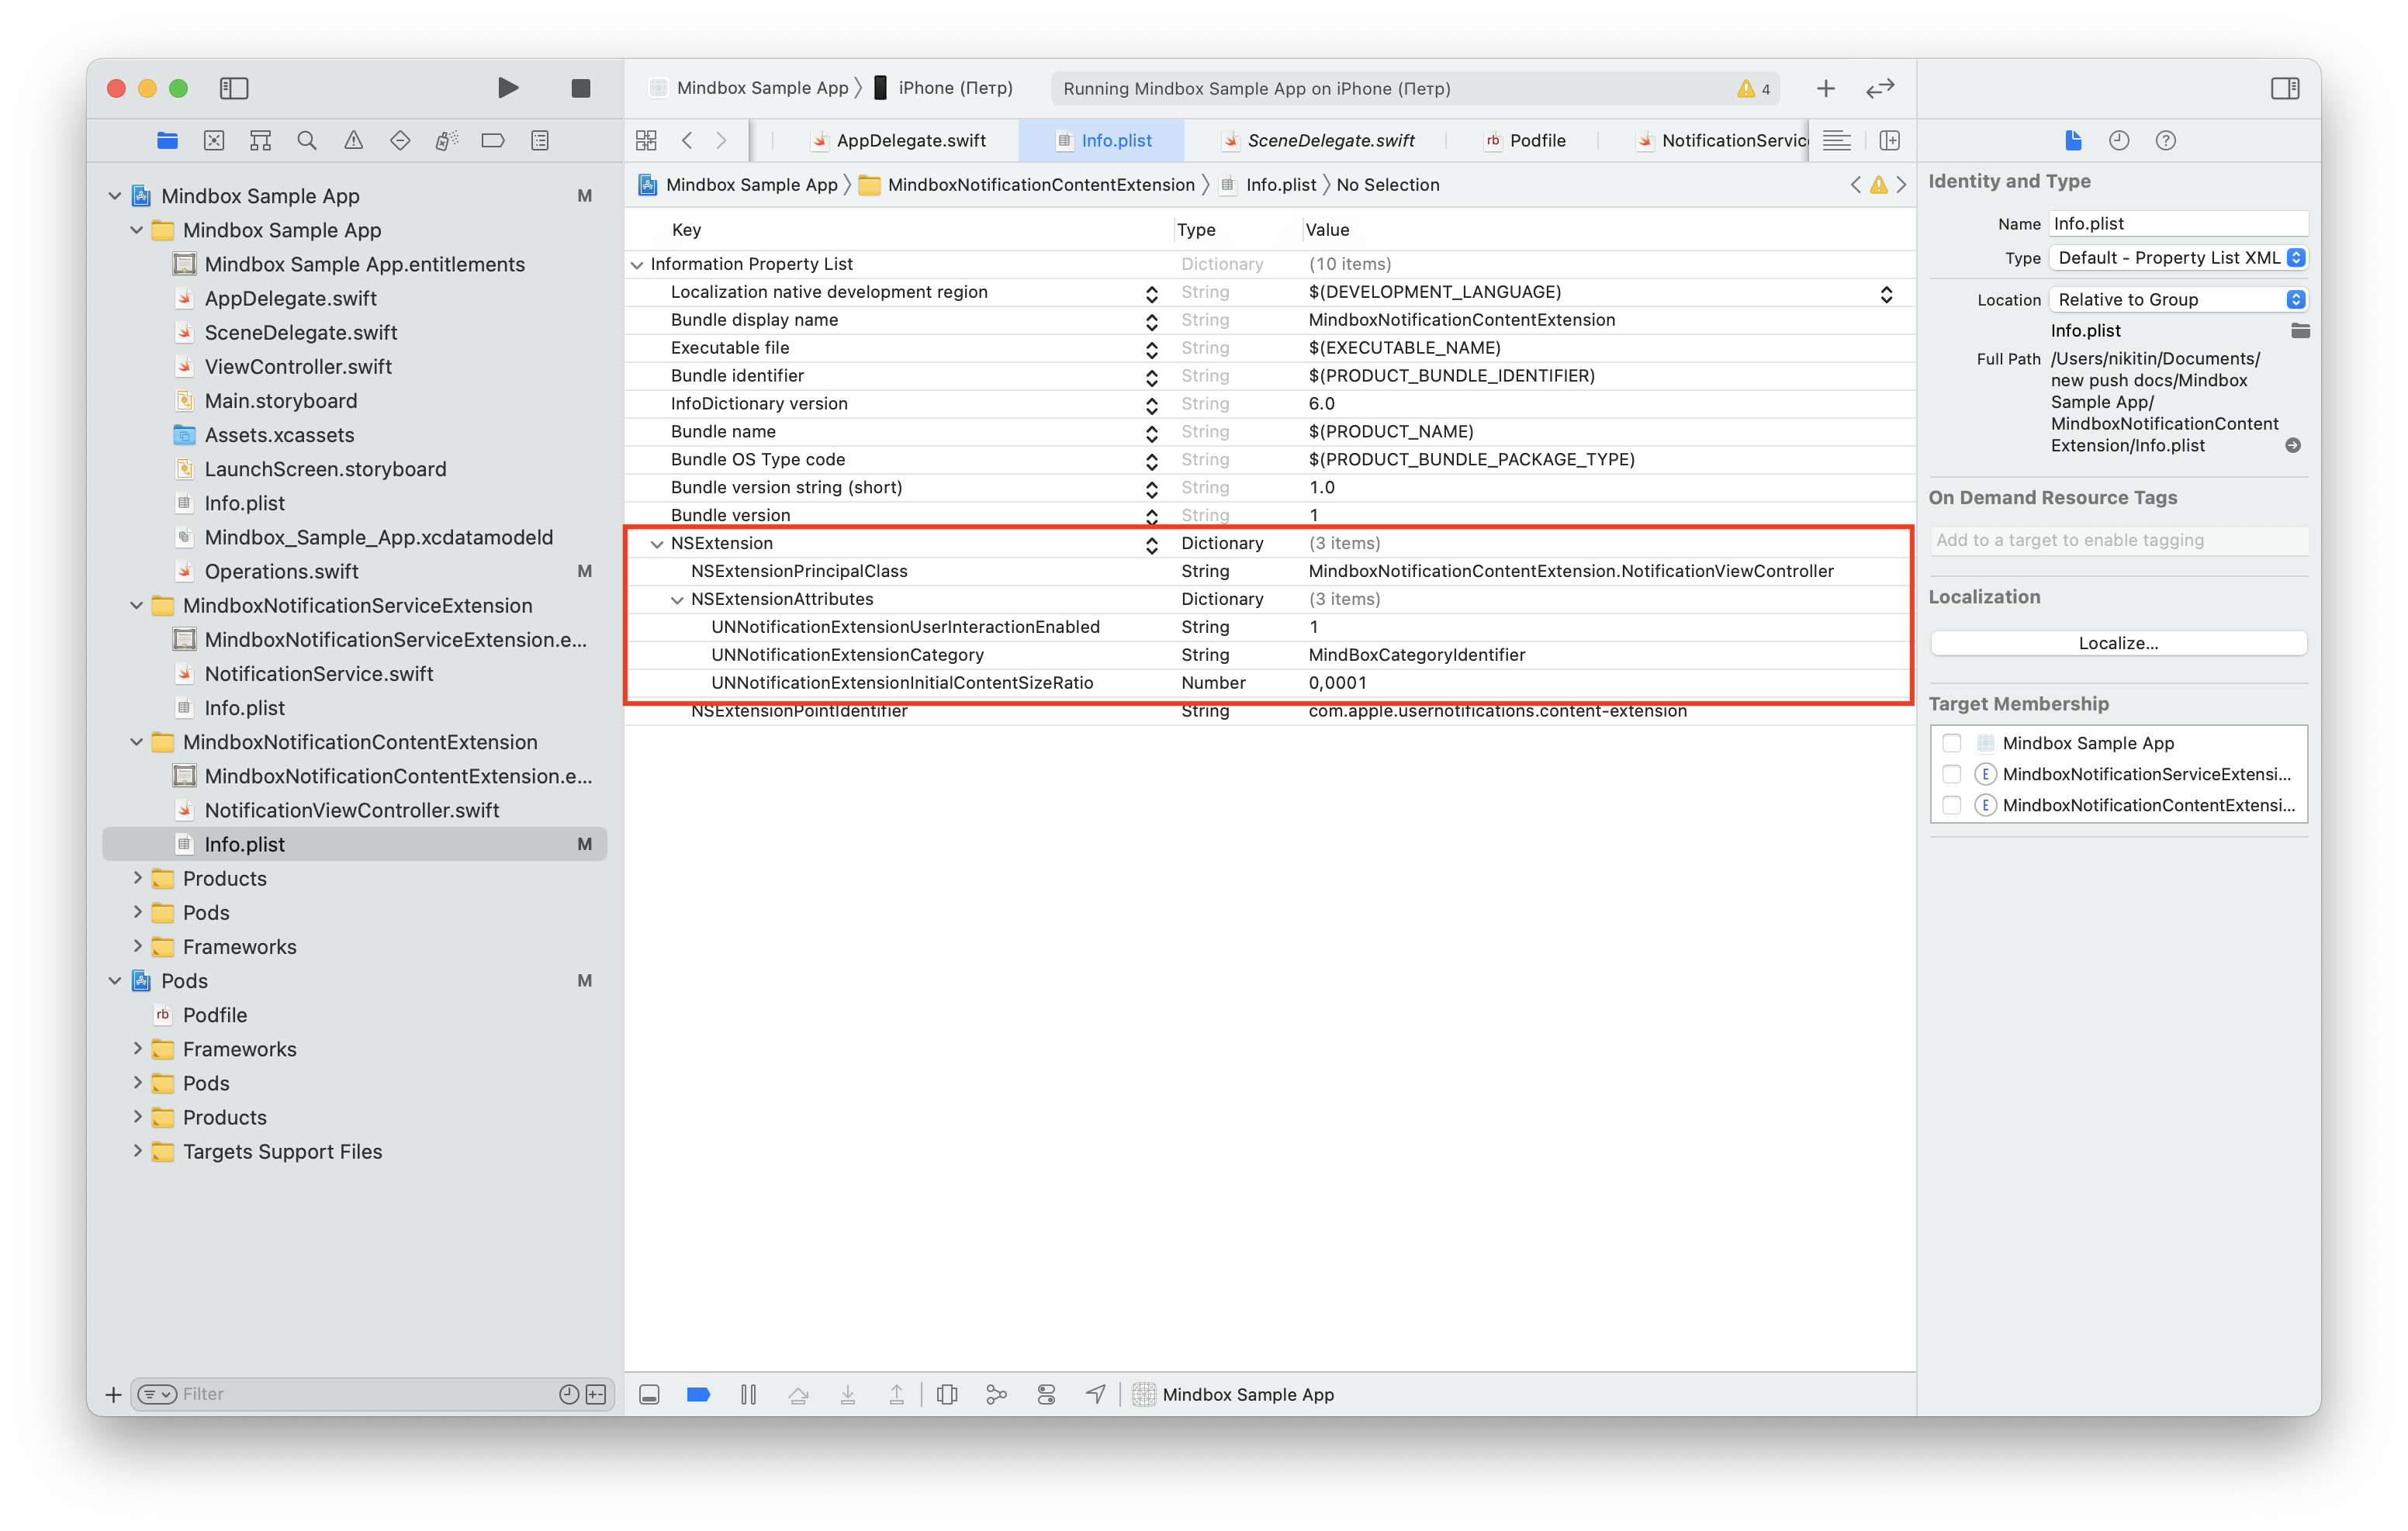
3.3 Setting up info.plist
Adjustinfo.plist as follows:
- Delete the
NSExtensionMainStoryboardkey. - Add the following keys:
| Key | Value |
|---|---|
NSExtensionPrincipalClass | Create using this template: If you follow the guide, you should get the following result: |
UNNotificationExtensionCategory | If you apply the simple method to implement the Service Extension, you should get the following result:MindBoxCategoryIdentifier |
UNNotificationExtensionInitialContentSizeRatio | 0.0001 |
UNNotificationExtensionUserInteractionEnabled | 1 |
The result should look like the screenshot below:
3.4 Deleting MainInterface.storyboard
MainInterface.storyboardWhen you add the extension, a .storyboard file is created in the folder. Delete it to leave Mindbox’s API method to handle the UI.
If the basic method above does not work for you, you can code your Rich Push layout from scratch.
There are no special recommendations here — you do not have to specify any additional methods.
Check that buttons are displayed when you tap a push notification.
To debug common errors, refer to the SDK Integration Checklist.
By now, you should see the following results:
The target device displays a mobile push notification with a small square image on the right. A long tap unfolds the image to full screen.
Once expanded, the mobile push notification displays the buttons you have set up.
Updated 8 months ago