

2. Initializing SDK
Before you begin, make sure you’ve completed these steps:
Configuring Integration Points:
The SDK Initialization step is successfully completed, if:
- The application launches without errors on both platforms (iOS and Android).
- The Xcode developer console displays Mindbox SDK's deviceUUID.
- Additionally, only in the case if you're implementing integration that includes creating and subscribing an anonymous user in the Maestra system, make sure that a customer is created.
1. Selecting SDK Configuration
Follow your marketing team requirements to select a fitting SDK configuration.
Obtain the <project endpoint> from your Maestra Forward Deployed Marketer or check it in in the integration point settings. Note that <project endpoint> is case-sensitive, distinguishing between uppercase and lowercase characters.
1. I want to pass anonymous users to Maestra and send them push notifications
const configuration = {
        domain: 'api.maestra.io',
        endpointId:
          Platform.OS === 'ios'
            ? '<endpoint for iOs>'
            : '<endpoint for Android>',
        subscribeCustomerIfCreated: true,
        shouldCreateCustomer: true,
      };
2. I want to pass anonymous users to Maestra without enabling push notifications
const configuration = {
        domain: 'api.maestra.io',
        endpointId:
          Platform.OS === 'ios'
            ? '<endpoint for iOs>'
            : '<endpoint for Android>',
        subscribeCustomerIfCreated: false,
        shouldCreateCustomer: true,
      };
3. Don't pass anonymous users to Maestra
const configuration = {
        domain: 'api.maestra.io',
        endpointId:
          Platform.OS === 'ios'
            ? '<endpoint for iOs>'
            : '<endpoint for Android>',
        subscribeCustomerIfCreated: false,
        shouldCreateCustomer: false,
      };
2. Initializing SDK
2.1. Configuring the React Native part of the project
Initialize the SDK synchronously in the main application file App.tsx / App.js, using the configuration option selected in Step 1.
import MindboxSdk from 'mindbox-sdk';
import React, {useCallback, useEffect, useState} from 'react';


const App = () => {
    const appInitializationCallback = useCallback(async () => {
        try {
            INSERT THE SDK CONFIGURATION CHOSEN IN STEP 1 HERE
            await MindboxSdk.initialize(configuration);
        } catch (error) {
            console.log(error);
        }
    }, []);

    ....


    return()
}To verify that initialization has been done correctly, add a console log of the deviceUUID in any suitable location.
We recommend logging the deviceUUID right after invoking Mindbox.init.
Start the app from Android Studio on an actual or emulated device:
import MindboxSdk from 'mindbox-sdk';
import React,{useCallback, useEffect, useState} from 'react';
const App = () => {

...

MindboxSdk.getDeviceUUID(console.log);

return ();
}
Run the app on Android and check if the implementation step was successful.
2.2. Setting up the iOS part of the project
To enable Mindbox SDK in a React Native project, add the Mindbox iOS SDK to the native part of the project and perform the required configurations.
2.2.1. Adding AppGroups
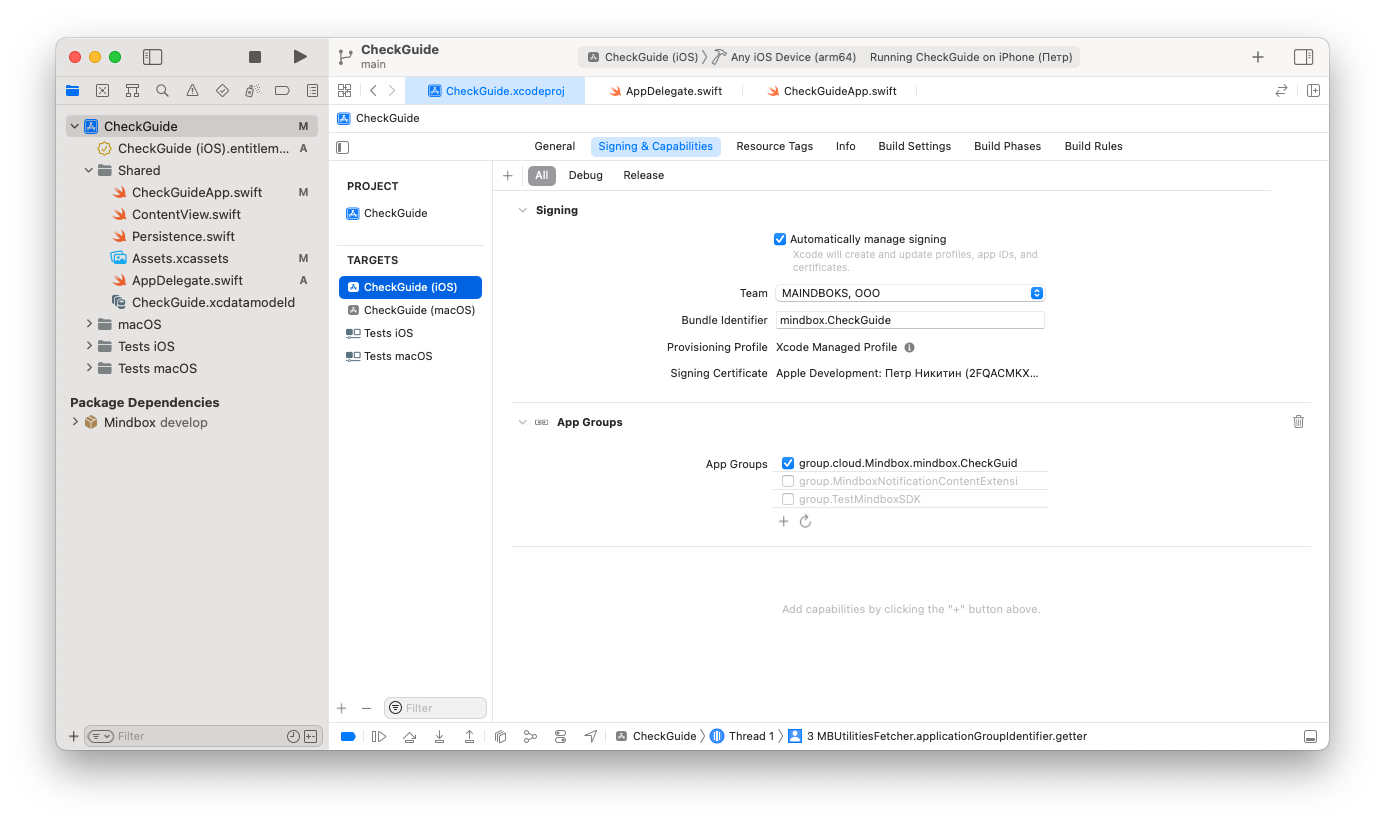
- Open the
{your_project}.xcworkspacefile in Xcode. - Open the project settings.
- Select the main option for Target.
- Navigate to the
Signing & Capabilitiestab. - Click the "Add" button and select
AppGroups. - Add a new group named according to the
templategroup.cloud.Mindbox.{application bundle ID}.
For example, if the application bundle ID isMindbox-Sample-App, the App Group should be named:group.cloud.Mindbox.Mindbox-Sample-App.
AppGroup must follow the naming template:
group.cloud.Mindbox.{application bundle ID}.
If the AppGroup template is incorrect in the Main Target, the app will fail to build. To verify the actual value, refer to the file with the.entitlementsextension.
SDK validates that the group name fits the template. Otherwise, SDK will flag it as an exception.
The SDK Initialization step is successfully completed, if:
- The application launches without errors on both platforms (iOS and Android).
- The Xcode developer console displays Maestra SDK's deviceUUID.
- Additionally, only in the case if you're implementing integration that includes creating and subscribing an anonymous user in the Maestra system, make sure that a customer is created.
To modify the endpoint
If your app operates in multiple countries and the customer's precise location is only determined after launch, changing the endpoint may be required to properly transmit country data. To do this, invoke MindboxSdk.initialize again and specify the new endpoint in the configuration.
Updated 2 months ago